Ticket dispensers
‘Offline’ message
If this message appears on the ticket dispenser’s touchscreen, it means that the device might be under maintenance (triggered when the printer’s tab is open) or that the device lost connection to the system.
Resolution 1
Check printer’s tab and network cable
- Open the ticket dispenser’s door.
- Check if the printer’s tab is closed. If not, close it.
- Check if the network cable is properly connected to the network outlet or network switch. If not, connect it.
- Close the ticket dispenser’s door.
Resolution 2
Restart the ticket dispenser
- Open the ticket dispenser’s door.
- Turn off the ticket dispenser by setting the power switch to the 'off'/'0' position.
- Disconnect the ticket dispenser from the power outlet.
- Disconnect the network cable from the ticket dispenser.
- Wait 1 minute with the ticket dispenser turned off and disconnected cables.
- Reconnect the ticket dispenser’s network and power cables.
- Turn on the ticket dispenser by setting the power switch to the ‘on’/’1’ position.
- Close the ticket dispenser’s door.
Resolution 3
Change the ticket dispenser’s layout
- Access the system’s backoffice.
- Go to the ticket dispenser’s configuration page.
- Make a change on the ticket dispenser’s layout and save it.
- Wait for the new layout to be applied.
Resolution 4
Check the ticket dispenser’s network settings
- Check with the network administrator if changes have been made to the network.
- Access the ticket dispenser's IP address from a web-browser in a device connected to the system’s network.
- Check if the ticket dispenser's network settings are correct. If not, change the network settings to the correct parameters.
Resolution 5
Change the ticket dispenser’s microSD card
- Open the ticket dispenser’s door.
- Turn off the ticket dispenser by setting the power switch to the 'off'/'0' position.
- Using a tweezer, pick the microSD card carefully and pull it out of the Raspberry Pi:
- Flash the image in the new microSD card, or try and reflash it on the microSD card you removed if it is not corrupted (follow the instructions available on the guide ‘How to flash an image on a ticket dispenser’).
- Insert the microSD card in the Raspberry Pi:
- Turn on the ticket dispenser by setting the power switch to the ‘on’/’1’ position.
- Close the ticket dispenser’s door.
- Run the ticket dispenser’s registration process.
Blank paper ticket
If nothing is printed on the ticket, it probably means that the paper in not placed correctly and it is printing on the wrong side of the paper.
Resolution 1
Check the paper roll’s position
- Open the ticket dispenser’s door.
- Open the printer’s tab.
- Remove the paper roll and place it according to the following figure:
- Close the printer’s tab.
- Close the ticket dispenser’s door.
Resolution 2
Check the USB cable connecting the Raspberry Pi to the printer
- Open the ticket dispenser’s door.
- Turn off the ticket dispenser by setting the power switch to the 'off'/'0' position.
- Disconnect the ticket dispenser from the power outlet.
- Disconnect the network cable from the ticket dispenser.
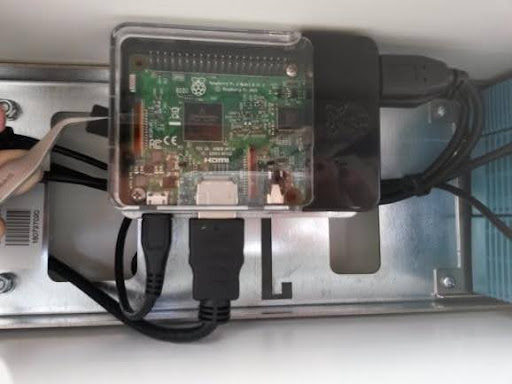
- Identify the USB cable that comes from the printer and disconnect the other end from the Raspberry Pi.
- Connect the USB cable in another available USB port of the Raspberry Pi:
- Reconnect the ticket dispenser’s network and power cables.
- Turn on the ticket dispenser by setting the power switch to the ‘on’/’1’ position.
- Close the ticket dispenser’s door.
Touchscreen not responding to touch
If the touchscreen is not responding to touch, it probably means that the USB port being used is not working properly.
Resolution 1
Check the USB cable connecting the Raspberry Pi to the touchscreen
- Open the ticket dispenser’s door.
- Turn off the ticket dispenser by setting the power switch to the 'off'/'0' position.
- Disconnect the ticket dispenser from the power outlet.
- Disconnect the network cable from the ticket dispenser.
- Identify the USB cable that comes from the touchscreen and disconnect the other end from the processor.
- Connect the USB cable in another available USB port of the processor:
- Reconnect the ticket dispenser’s network and power cables.
- Turn on the ticket dispenser by setting the power switch to the ‘on’/’1’ position.
- Close the ticket dispenser’s door.
Resolution 2
Check the cables connected to the touchscreen
- Open the ticket dispenser’s door.
- Turn off the ticket dispenser by setting the power switch to the 'off'/'0' position.
- Disconnect the ticket dispenser from the power outlet.
- Disconnect the network cable from the ticket dispenser.
- Remove the 2 screws (M4 25 mm countersunk Philips or Allen 2.5) below the ticket dispenser’s head:
- Remove the touchscreen frame from the ticket dispenser (slide it up slightly and then pull it towards you).
- Disconnect and reconnect the cables connected to the touchscreen: HDMI cable, power cable, and USB cable:
- Reconnect the ticket dispenser’s network and power cables.
- Turn on the ticket dispenser by setting the power switch to the ‘on’/’1’ position.
- Close the ticket dispenser’s door.
Blank touschscreen
If the touchscreen is not displaying anything, it might mean different things: either the Raspberry Pi is not working probably, a cable might not be correctly connected or is not working properly, or the software image is corrupted.
Resolution 1
Check the Raspberry Pi
- Open the ticket dispenser’s door.
- Turn on the ticket dispenser by setting the power switch to the ‘on’/’1’ position.
- Check if the LEDs of the Raspberry Pi (green and red) are active. If not, contact the second line of support or, if authorized to do such operation, replace the Raspberry Pi and check if the problem persists.
- Close the ticket dispenser’s door.
Resolution 2
Check the cables connected to the touchscreen
- Open the ticket dispenser’s door.
- Turn off the ticket dispenser by setting the power switch to the 'off'/'0' position.
- Disconnect the ticket dispenser from the power outlet.
- Disconnect the network cable from the ticket dispenser.
- Remove the 2 screws (M4 25 mm countersunk Philips or Allen 2.5) below the ticket dispenser’s head:
- Remove the touchscreen frame from the ticket dispenser (slide it up slightly and then pull it towards you).
- Disconnect and reconnect the cables connected to the touchscreen: HDMI cable, power cable, and USB cable:
- Reconnect the ticket dispenser’s network and power cables.
- Turn on the ticket dispenser by setting the power switch to the ‘on’/’1’ position.
- Close the ticket dispenser’s door.
Resolution 3
Change the ticket dispenser’s microSD card
- Open the ticket dispenser’s door.
- Turn off the ticket dispenser by setting the power switch to the 'off'/'0' position.
- Using a tweezer, pick the microSD card carefully and pull it out of the Raspberry Pi:
- Flash the image in the new microSD card, or try and reflash it on the microSD card you removed if it is not corrupted (follow the instructions available on the guide ‘How to flash an image on a ticket dispenser’).
- Insert the microSD card in the Raspberry Pi:
- Turn on the ticket dispenser by setting the power switch to the ‘on’/’1’ position.
- Close the ticket dispenser’s door.
- Run the ticket dispenser’s registration process.
Not starting
If the ticket dispenser is not starting, it probably means that it might have a problem with the power supply.
Resolution 1
Restart the ticket dispenser
- Open the ticket dispenser’s door.
- Turn off the ticket dispenser by setting the power switch to the 'off'/'0' position.
- Disconnect the ticket dispenser from the power outlet.
- Disconnect the network cable from the ticket dispenser.
- Wait 1 minute with the ticket dispenser turned off and disconnected cables.
- Reconnect the ticket dispenser’s network and power cables.
- Turn on the ticket dispenser by setting the power switch to the ‘on’/’1’ position.
Resolution 2
Check the power supplies
- Open the ticket dispenser’s door.
- Connect the ticket dispenser to the power outlet.
- Turn on the ticket dispenser by setting the power switch to the ‘on’/’1’ position.
- Check if the LEDs of the power supplies are active. If not, contact the second line of support or, if authorized to do such operation, replace the power supplies and check if the problem persists.